Tampilkan postingan dengan label tutorial. Tampilkan semua postingan
Tampilkan postingan dengan label tutorial. Tampilkan semua postingan
Minggu, 06 Februari 2011
How To Use PowerBlogger
##################################################################### - PowerBlogger - ###
#### - parsers and all functionality by d3c3p710n blackhatworld.com member - ###
#### - design and Bookmarkshooter by kaidoristm blackhatworld.com member - ###
#### - Version: 1.0 - ###
####################################################################
Upload powerblogger folder to your host.
Set chmod 777 for next files (folders)
1) save
2) write/customhtml
3) write/links
4) write/config.xml
5) bookmarkshooter/inc/save
6) bookmarkshooter/config.xml
7) bookmarkshooter/acc2/save
8) bookmarkshooter/acc2/config.xml
9) bookmarkshooter/acc3/save
10) bookmarkshooter/acc3/config.xml
11) bookmarkshooter/acc4/save
12) bookmarkshooter/acc4/config.xml
13) bookmarkshooter/acc5/save
14) bookmarkshooter/acc5/config.xml
Set chmod 666 for next files (folders)
1) write/blogspot_blogs.csv
2) bookmarkshooter/inc/login.csv
3) bookmarkshooter/inc/rss_feeds.csv
4) bookmarkshooter/inc/acc2/login.csv
5) bookmarkshooter/inc/acc2/rss_feeds.csv
6) bookmarkshooter/inc/acc3/login.csv
7) bookmarkshooter/inc/acc3/rss_feeds.csv
8) bookmarkshooter/inc/acc4/login.csv
9) bookmarkshooter/inc/acc4/rss_feeds.csv
10) bookmarkshooter/inc/acc5/login.csv
11) bookmarkshooter/inc/acc5/rss_feeds.csv
Configure powerblogger folder with htaccess and your ready to start.
To acess script go to http://YOURDOMAIN/powerblogger/index.php if you uploaded your powerblogger folder to publichtml root folde
if not then its up to you to find your access address.
Commands for automation through cronjob. (commads are through cpanel standard version)
1) to automate posting to blogger blogs through blogger e-mail command: wget -O - -q -t 1 http://YOURDOMAIN/powerblogger/inc/publish.php
2) automate account 1 for bookmarking command: wget -O - -q -t 1 http://YOURDOMAIN/powerblogger/bookmarkshooter/bookmark.php
3) automate account 2 for bookmarking command: wget -O - -q -t 1 http://YOURDOMAIN/powerblogger/bookmarkshooter/acc2/bookmark.php
4) automate account 3 for bookmarking command: wget -O - -q -t 1 http://YOURDOMAIN/powerblogger/bookmarkshooter/acc3/bookmark.php
5) automate account 4 for bookmarking command: wget -O - -q -t 1 http://YOURDOMAIN/powerblogger/bookmarkshooter/acc4/bookmark.php
6) automate account 5 for bookmarking command: wget -O - -q -t 1 http://YOURDOMAIN/powerblogger/bookmarkshooter/acc5/bookmark.php
Installation on local computer (with xampp)
Place powerblogger folder (for default installation) to c:/xampp/htdocs
To setup a Windows machine to run cron.php at a specific time follow the specific instructions below. This can be useful if you are not familiar with Linux/Unix, or if your web host does not offer the ability to run cron jobs; you can run them remotely from your own computer.
Note: These instructions were written for Windows XP but should be similar in other versions of Windows.
Creating a Scheduled Task
1. Open Scheduler
2. Go to Start > Programs > Accessories > System Tools > Scheduled Tasks
3. Double-click Add Scheduled Task
4. The Scheduled Task Wizard will appear. Click Next.
5. Select the program to run. Choose your browser from the list (for example, wget you need to browse to installation location). Click Next.
6. Give the task a Name, such as Drupal Cron Job, and choose the Frequency with which to perform the task (for example, Daily)). Click Next.
7. Choose specific date and time options (this step will vary, depending on the option selected in the previous step). When finished, click Next.
8. Enter your password if prompted. Change the username if required (for example, you'd like the task to run under a user with fewer privileges security reasons). Click Next.
9. On the final page, select the checkbox Open advanced properties for this task when I click Finish and click Finish.
Configuring the task
1. Go to the task's setting page either by checking the checkbox at the end of the last step, or by double-clicking on the task.
2. In the Run box, after the text that is there now (for example, "C:\Program Files\GnuWin32\bin\wget.exe"), enter a space and then type the address to your website's cron.php page in double quotations (for example, "C:\Program Files\GnuWin32\bin\wget.exe" -O - -q -t 1 http://localhost/powerblogger/inc/publish.php
3. To set a frequency more often than Daily (for example, hourly), click the Schedule tab, then click Advanced. Here you can set options such as Repeat task, every 1 hour for 23 hours. Click Ok when finished.
4. Change the start time on the task to one minute from the current time. This will allow you to test the task and make sure that it is working.
5. When all settings have been configured to your liking, click Apply and OK (note: you may be prompted for your password)
wget download location: http://gnuwin32.sourceforge.net/packages/wget.htm
BookmarkShooter:
BookmarkShooter uses for bookmarking your blog feed you need to use short or summary feeds on your blog or description will be too long and Onlywire wont accept it.
It uses title as your post title and for description your short feed. You need to define tags by yourself (see your account screen) dont configure cron per account to submit more than 5 times a day thats Onlywires limit.
Happy Autoblogging
Kamis, 13 Januari 2011
Instalasi Garmin Mobile XT for Windows Mobile
GPS merupakan teknologi yang sangat berguna untuk mengetahui posisi kita berada. Jika dulu teknologi GPS hanya terdapat pada device-device tertentu. Kini teknologi GPS pun sudah bisa di masukkan ke dalam smartphone ataupun PDA.

Tetapi tentunya kurang maksimal apabila pada PDA kita hanya terdapat Hardware GPS-nya saja tanpa didukung oleh softwarenya. Salah satu software antarmuka untuk GPS yang cukup populer adalah Garmin Mobile XT.
Nah… disini saya akan memberitahu, bagaimana cara untuk menginstal Garmin Mobile XT di Windows Mobile.
| 1 | Download Installer Garmin Mobile XT v5.00.20w disini |
| 2 | Lakukan instalasi dari komputer dengan menggunakan Active Sync. Ikuti instruksi yang ada. Lalu Soft Reset |
| 3 | Setelah boot dan masuk windows, jika diminta untuk menjalankan program pilih NO |
| 4 | Masuk ke file manager pada PDA, lalu pilih Storage Card dan anda akan menemukan folder 2577. Hapus folder tersebut |
| 5 | Sekarang masuk ke menu program pada PDA, anda akan menemukan shortcut Garmin Mobile XT. Jalankan Aplikasi Garmin Mobile XT. Jika muncul menu, pilih pilihan yang baling bawah “Connect to a Garmin GPS” |
| 6 | Lalu ikuti instruksi yang ada dan pilih “ I Agree” pada peringatan yang muncul |
| 7 | Pilih Tools è Settings è klik anak panah ke bawah dan pilih About |
| 8 | Catat informasi yang ada pada menu About Untuk PDA yang meggunakan Bluetooth GPS receiver gunakan “ESN ID” atau “CARD ID“ Untuk PDA yang menggunakan Internal Built in GPS (Kaiser, D810, Artemis) gunakan “UNIT ID” atau “CARD ID“ |
| 9 | Quit program |
| 10 | Run garmin_keygen_v1.5 yang bisa didownload disini |
| 11 | Masukkan ID yang telah kita catat tadi dan klik Generate |
| 12 | Copy code (25 karakter) yang muncul |
| 13 | Buka file “sw.unl” pada Garmin folder di Storage Card dengan notepad lalu hapus kode yang ada dan ganti dengan code yang telah kita generate tadi |
| 14 | Jalankan aplikasi Garmin Mobile XT |
Dan untuk peta wilayah Indonesia bisa didownload disini dengan mengikuti petunjuk yang ada.
Cara instalasi, jalankan aplikasi peta (navnet_grm_v161u.exe) yang telah kita download. Dan akan muncul file-file hasil extract, lalu copy kan semua file-file tersebut ke root folder Garmin di Storage Card.
Cara instalasi, jalankan aplikasi peta (navnet_grm_v161u.exe) yang telah kita download. Dan akan muncul file-file hasil extract, lalu copy kan semua file-file tersebut ke root folder Garmin di Storage Card.
http://adaapanya.blogspot.com/search/label/Instalasi%20Garmin%20Mobile%20XT%20for%20Windows%20Mobile
Rabu, 19 Agustus 2009
Membuat Font Pribadi dengan Private Character Editor
Saya baru mengetahui kalau di Windows XP ada tool yang namanya Private Character Editor. Dengan tool ini kita dapat membuat karakter/huruf pribadi (atau logo) yang digunakan dalam font library. Kita dapat membuat sampai dengan 6.400 karakter pribadi, baik dengan memulai dari halaman kosong atau mengedit salah satu karakter dari jenis font yang sudah terinstall dalam komputer. Shortcut tool ini tidak dapat ditemui dalam program menu, itulah sebabnya sebagian pengguna bisa jadi tidak mengetahui keberadaannya seperti saya.
Untuk mulai menjalankan Private Character Editor, dapat dilakukan dari Start – Run, kemudian ketikkan eudcedit. Setelah itu akan nampak jendela seperti image di bawah ini

Kotak-kotak tersebut merupakan ruang penyimpanan karakter yang kita buat. Jika belum pernah membuat, pilih salah satu, atau agar terurut pilih kotak kiri-atas, baru kemudian pilih OK. Selanjutnya kita dapat mulai membuat karakter yang diinginkan dengan pilihan peralatan pada toolbar sebelah kiri (atau melalui menu Tool – Item).

Seperti telah saya sebutkan di atas, karakter yang akan dibuat dapat mengedit dari karakter suatu jenis font yang telah ada, dengan menggunakan menu Edit – Copy character.. Kita dapat mengasosiasikan karakter yang dibuat untuk salah satu jenis font atau untuk semua jenis font (default). Untuk mengubahnya dilakukan dari menu File – Links..
Jika sudah selesai simpan karakter yang telah dibuat dengan menu Save Character atau Save Character As.. Selanjutnya kita telah siap menggunakan karakter font yang telah dibuat.
Untuk menggunakannya, buka aplikasi dimana karakter yang dibuat akan digunakan. Selanjutnya buka Character Map, dari Start – All Programs – Accessories — System Tools. Jika sebelumnya kita mengelinkan karakter yang dibuat untuk semua jenis font, maka pilih pada All Fonts (Private Character) atau jika sebelumnya mengelink-kan dengn font tertentu carilah nama font tersebut yang di sertai (Private Character).

Setelah itu akan muncul daftar karakter yang telah dibuat, dan pilih karakter yang akan digunakan dengan cara meng-kliknya dilanjutkan mengklik tombol Select dan Copy.
Kembali ke aplikasi atau program yang akan menggunakan, di sini kita paste-kan karakter tersebut. Selamat menggunakan karakter sendiri.
Senin, 27 Juli 2009
The ultimate guide to prim twisting [UPDATE]
[UPDATE: September 12, 2009] I corrected a few mistakes over time (thanks for the head-ups everyone), so if something didn't work for you, try again now :)
Aah, prims. Plywood shapes that magically turn into the most beautiful SL builds. Yes, those prims know how to twist and shout! ... Wait, wh... what?! ... I'm talking about prim twisting - shaping prims into unusual shapes. Prim magic!
We've got sculpties in SL now, which means almost any prim shape is possible without big prim cost. But back then, before sculpties rocked SL, you needed different methods - you needed methods that worked with regular prims. These methods were discovered by early SL residents and sometimes kept secret (the famous one prim double knot for example). I think even the most advanced builder/sculpter should know the basics. You should never underestimate the power of regular prims. That's why I'm giving you this ultimate guide to prim twisting. Every item shown here is only one prim!
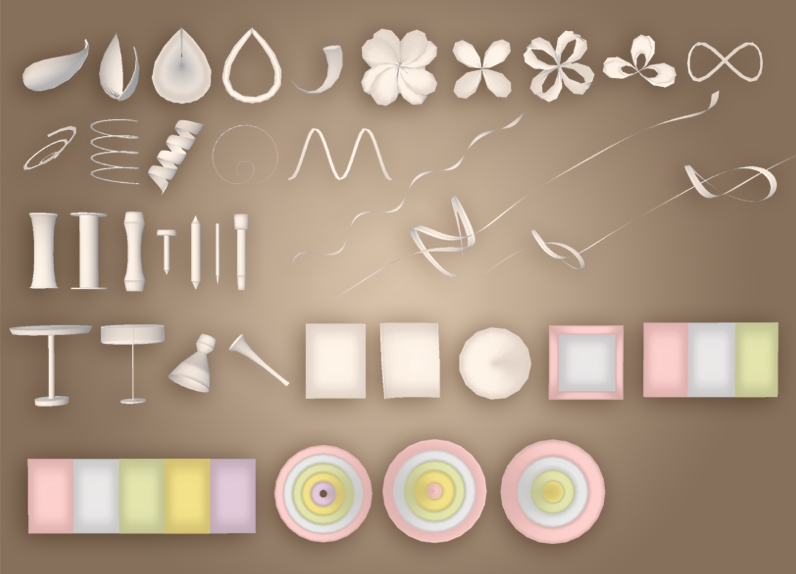
Enjoy, comment and share with friends :)
Leaf

Two leaves

Flat leaf / raindrop

Claw

Flower I

Flower II

Ribbon I

Ribbon II

Infinity symbol

Spring I

Spring II

Spring III

String

Knot

Double knot

Light bulb wire
Wave

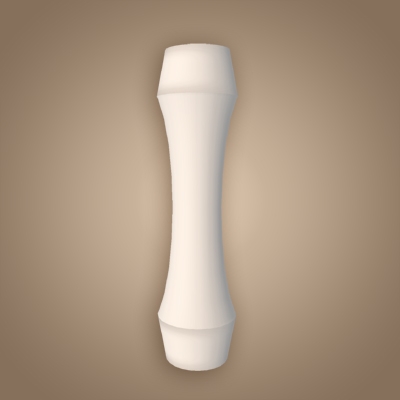
Column I
Column II

Column III
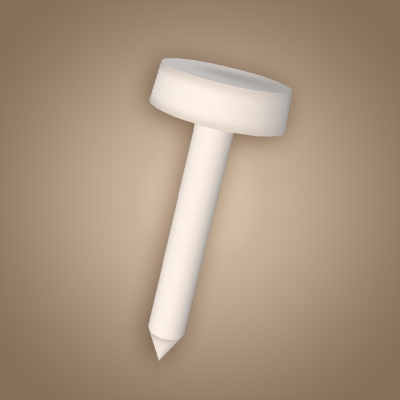
Nail
Stake

Pencil

Torch holder

Bar table

Table lamp

Desk lamp top

Trumpet

Thin flat paper

Curled paper

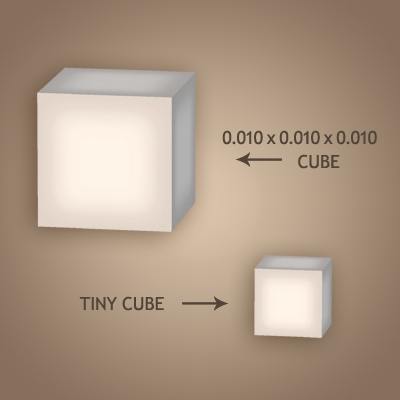
Tiny cube
Tiny cylinder

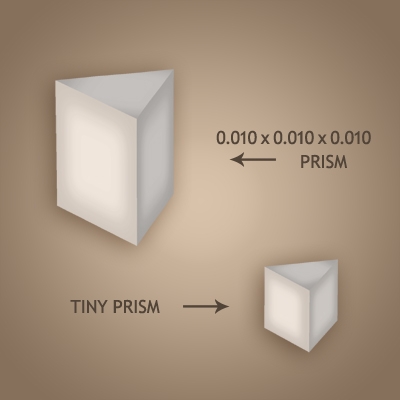
Tiny prism
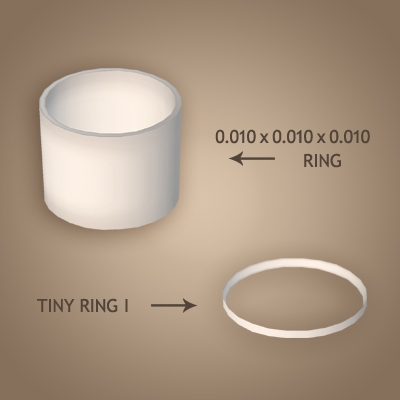
Tiny ring I
Tiny ring II

Tiny zircon
20m disc
Framed picture
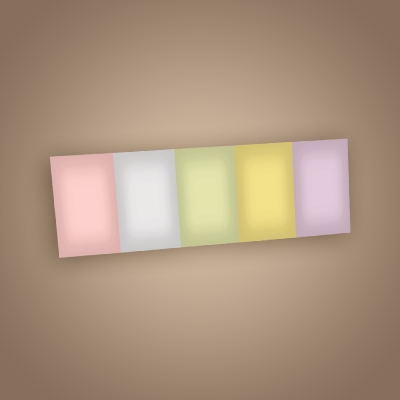
3 faces display panel
5 faces display panel
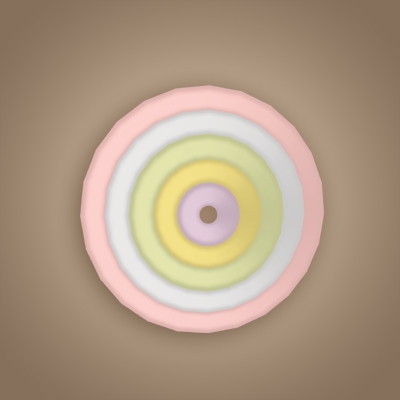
5 rings target with a hole
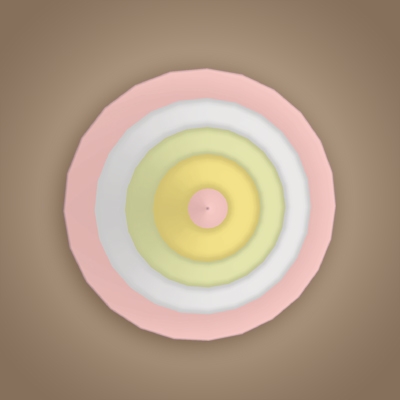
5 rings target (no hole)
4 rings target

Aah, prims. Plywood shapes that magically turn into the most beautiful SL builds. Yes, those prims know how to twist and shout! ... Wait, wh... what?! ... I'm talking about prim twisting - shaping prims into unusual shapes. Prim magic!
We've got sculpties in SL now, which means almost any prim shape is possible without big prim cost. But back then, before sculpties rocked SL, you needed different methods - you needed methods that worked with regular prims. These methods were discovered by early SL residents and sometimes kept secret (the famous one prim double knot for example). I think even the most advanced builder/sculpter should know the basics. You should never underestimate the power of regular prims. That's why I'm giving you this ultimate guide to prim twisting. Every item shown here is only one prim!
Enjoy, comment and share with friends :)
Leaf
- Rez a sphere
- Set Size to: X=0.500, Y=0.250 and Z=0.370
- Set Path Cut to: B=0.000 and E=0.500
- Set Hollow to: 95.0
- Set Twist to: B=180 and E=-180
Two leaves
- Rez a sphere
- Set Size to: X=0.500, Y=0.300 and Z=0.300
- Set Path Cut to: B=0.700 and E=1.000
- Set Hollow to: 95.0
- Set Twist to: B=360 and E=47
- Set Dimple to B=0.100 and E=0.950 (use these two options to differentiate leaves sizes)
Flat leaf / raindrop
- Rez a sphere
- Set Size to: X=0.500, Y=0.500 and Z=0.010
- Set Twist to: B=360 and E=-360
- Set Dimple to B=0.000 and E=0.050
- If you want to have a flat leaf contour, set Hollow to: 85.0
Claw
- Rez a torus
- Set Size to: X=0.430, Y=0.500 and Z=0.500
- Set Path Cut to: B=0.500 and E=1.000
- Set Taper to: X=1.00 and Y=1.00
Flower I
- Rez a tube
- Set Size to: X=0.070, Y=0.350 and Z=0.350
- Set Twist to: B=-360 and E=360
- Set Hole Size to: X=1.00 and Y=0.50
Flower II
- Rez a sphere
- Set Size to: X=0.010, Y=0.500 and Z=0.500
- Set Twist to: B=360 and E=-360
- Set Dimple to: B=0.000 and E=0.050
Ribbon I
- Rez a sphere
- Set Size to: X=0.010, Y=0.500 and Z=0.500
- Set Hollow to: 95.0
- Set Twist to: B=-360 and E=360
- Set Dimple to: B=0.700 and E=1.000
Ribbon II
- Rez a sphere
- Set Size to: X=0.035, Y=0.500 and Z=0.500
- Set Path Cut to: B=0.130 and E=0.870
- Set Hollow to: 50.0
- Set Twist to: B=-360 and E=360
- Set Dimple to: B=0.450 and E=0.550
Infinity symbol
- Rez a sphere
- Set Size to: X=0.500, Y=0.500 and Z=0.010
- Set Hollow to: 95.0
- Set Twist to: B=0 and E=-360
- Set Dimple to: B=0.000 and E=0.050
Spring I
- Rez a torus
- Set Size to: X=0.100, Y=0.500 and Z=0.500
- Set Skew to: 0.80
- Set Twist to: B=-18 and E=0
- Set Hole Size to: X=0.70 and Y=0.05
- Set Taper to: X=1.00 and Y=0.00
- Set Radius to: 1 (but it will change to 0.947, so you can also just put this number in)
- Set Revolutions to: 2.50
Spring II
- Rez a torus
- Set Size to: X=0.500, Y=0.300 and Z=0.300
- Set Skew to: 0.80
- Set Hole Size to: X=0.10 and Y=0.05
- Set Revolutions to: 4.00
Spring III
- Rez a torus
- Set Size to: X=1.000, Y=0.150 and Z=0.150
- Set Skew to: 0.45
- Set Twist to: B=360 and E=-360
- Set Hole Size to: X=0.15 and Y=0.05
- Set Revolutions to: 4.00
String
- Rez a torus
- Set Size to: X=2.300, Y=0.500 and Z=0.500
- Set Hollow to: 80.0
- Set Skew to: 0.80
- Set Twist to: B=360 and E=360
- Set Hole Size to: X=0.05 and Y=0.50
- Set Profile Cut to: B=0.180 and E=0.200
- Set Taper to: X=0.00 and Y=0.50
- Set Revolutions to: 4.00
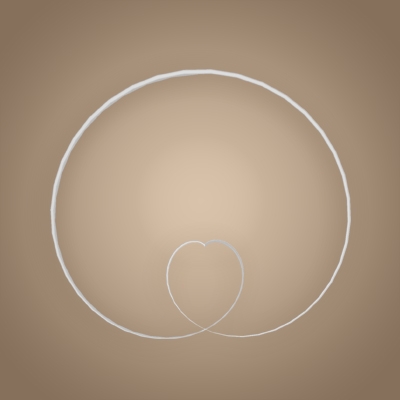
Knot
- Rez a torus
- Set Size to: X=2.500, Y=0.500 and Z=0.500
- Set Hollow to: 95.0
- Set Skew to: 0.95
- Set Twist to: B=-90 and E=360
- Set Hole Size to: X=0.05 and Y=0.50
- Set Profile Cut to: B=0.180 and E=0.200
- Set Revolutions to: 4.00
Double knot
- Rez a torus
- Set Size to: X=2.500, Y=0.500 and Z=0.500
- Set Hollow to: 95.0
- Set Skew to: 0.95
- Set Twist to: B=-360 and E=360
- Set Hole Size to: X=0.05 and Y=0.50
- Set Profile Cut to: B=0.180 and E=0.200
- Set Taper to: X=0.00 and Y=0.50
- Set Revolutions to: 4.00
Light bulb wire
- Rez a tube
- Set Size to: X=0.010, Y=0.500 and Z=0.500
- Set Hollow to: 95.0
- Set Skew to: 0.95
- Set Twist to: B=-180 and E=360
- Set Hole Size to: X=0.05 and Y=0.50
- Set Profile Cut to: B=0.000 and E=0.250
- Set Revolutions to: 3.00
Wave
- Rez a ring
- Set Size to: X=0.700, Y=0.350 and Z=0.010
- Set Skew to: 0.95
- Set Hole Size to: X=1.00 and Y=0.05
- Set Revolutions to: 2.00
Column I
- Rez a torus
- Set Size to: X=0.500, Y=0.230 and Z=0.230
- Set Hollow to: 95
- Set Profile Cut to: B=0.000 and E=0.500
Column II
- Rez a tube
- Set Size to: X=0.500, Y=0.230 and Z=0.230
- Set Hollow to: 95.0
- Set Profile Cut to: B=0.250 and E=1.000
Column III
- Rez a tube
- Set Size to: X=0.750, Y=0.300 and Z=0.300
- Set Hollow to: 80.0
- Set Hollow Shape to: Circle
- Set Hole Size to: X=0.70 and Y=0.40
- Set Profile Cut to: B=0.450 and E=0.800
Nail
- Rez a tube
- Set Size to: X=0.300, Y=0.300 and Z=0.300
- Set Hollow to: 75.0
- Set Hole Size to: X=1.00 and Y=0.50
- Set Profile Cut to: B=0.400 and E=0.750
Stake
- Rez a tube
- Set Size to: X=0.500, Y=0.500 and Z=0.500
- Set Hollow to: 75.0
- Set Hole Size to: X=1.00 and Y=0.50
- Set Profile Cut to: B=0.500 and E=0.750
Pencil
- Rez a tube
- Set Size to: X=1.000, Y=0.350 and Z=0.350
- Set Hollow to: 85.0
- Set Hole Size to: X=1.00 and Y=0.50
- Set Profile Cut to: B=0.650 and E=0.750
Torch holder
- Rez a tube
- Set Size to: X=0.500, Y=0.100 and Z=0.100
- Set Hollow to: 60.0
- Set Profile Cut to: B=0.500 and E=1.000
Bar table
- Rez a tube
- Set Size to: X=0.500, Y=0.500 and Z=0.500
- Set Hollow to: 85.0
- Set Hole Size to: X=1.00 and Y=0.50
- Set Profile Cut to: B=0.250 and E=0.850
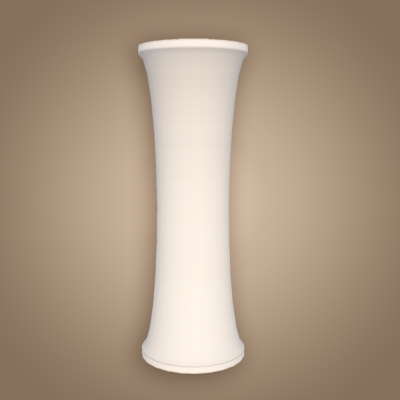
Table lamp
- Rez a tube
- Set Size to: X=0.500, Y=0.400 and Z=0.400
- Set Hollow to: 95.0
- Set Hole Size to: X=1.00 and Y=0.50
- Set Profile Cut to: B=0.200 and E=0.850
Desk lamp top
- Rez a ring
- Set Size to: X=0.500, Y=0.250 and Z=0.250
- Set Hollow to: 95.0
- Set Twist to: B=-36 and E=-36
- Set Hole Size to: X=1.00 and Y=0.45
- Set Profile Cut to: B=0.000 and E=0.600
Trumpet
- Rez a torus
- Set Size to: X=0.700, Y=0.250 and Z=0.250
- Set Hollow to: 95.0
- Set Hole Size to: X=1.00 and Y=0.45
- Set Profile Cut to: B=0.00 and E=0.300
Thin flat paper
- Rez a cube
- Set Size to: X=0.500, Y=0.400 and Z=0.010
- Set Slice to: B=0.490 and E=0.510
Curled paper
- Rez a cylinder
- Set Size to: X=0.450, Y=0.170 and Z=0.500
- Set Path Cut to: B=0.550 and E=0.900
- Set Hollow to: 95.0
- Set Twist to: B=27 and E=0
- Set Top Shear to: X=0.15 and Y=-0.10
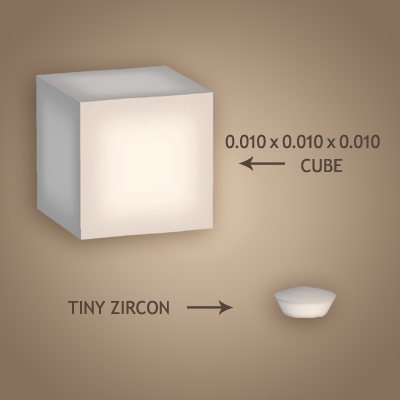
Tiny cube
- Rez a cube
- Set Size to: X=0.010, Y=0.010 and Z=0.010
- Set Path Cut to: B=0.625 and E=0.875
- Set Slice to: X=0.500 and Y=1.000
Tiny cylinder
- Rez a cylinder
- Set Size to: X=0.010, Y=0.010 and Z=0.010
- Set Taper to: X=1.00 and Y=1.00
- Set Slice to: X=0.490 and Y=0.510
Tiny prism
- Rez a cube
- Set Size to: X=0.010, Y=0.010 and Z=0.010
- Set Path Cut to: B=0.565 and E=0.695
- Set Slice to: X=0.250 and Y=0.750
Tiny ring I
- Rez a torus
- Set Size to: X=0.010, Y=0.010 and Z=0.010
- Set Hole Size to: X=1.00 and Y=0.05
- Set Profile Cut to: B=0.730 and E=0.750
Tiny ring II
- Rez a ring
- Set Size to: X=0.010, Y=0.010 and Z=0.010
- Set Hole Size to: X=1.00 and Y=0.05
- Set Profile Cut to: B=0.180 and E=0.200
Tiny zircon
- Rez a sphere
- Set Size to: X=0.010, Y=0.010 and Z=0.010
- Set Hollow to: 70.0
- Set Dimple to: B=0.850 and E=1.000
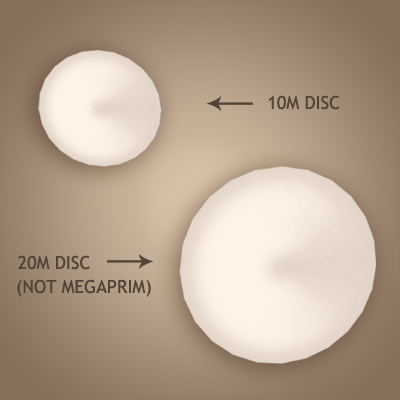
20m disc
- Rez a tube
- Set Size to: X=0.500, Y=10.000 and Z=10.000
- Set Twist to: B=90 and E=90
- Set Hole Size to: X=1.00 and Y=0.05
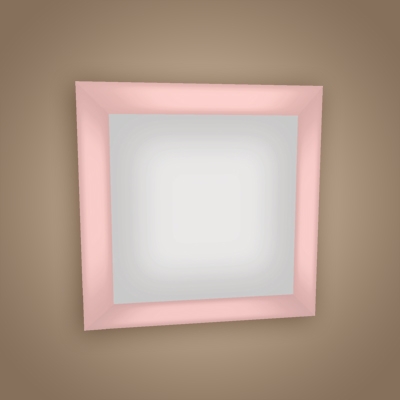
Framed picture
- Rez a cube
- Set Size to: X=0.500, Y=0.500 and Z=0.025
- Set Taper to: X=0.25 and Y=0.25
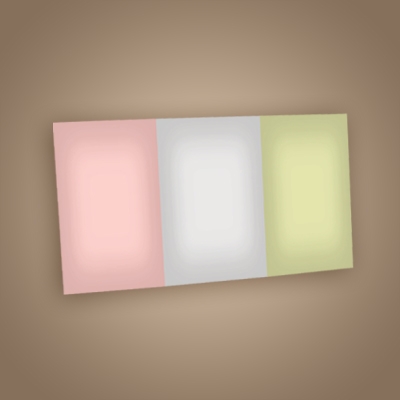
3 faces display panel
- Rez a cube
- Set Size to: X=0.900, Y=0.500 and Z=0.010
- Set Taper to: X=0.65 and Y=0.00
5 faces display panel
- Rez a tetrahedron
- Set Size to: X=0.010, Y=1.750 and Z=0.500
- Set Path Cut to: B=0.200 and E=0.800
- Set Hollow to: 67.0
- Set Taper to: X=0.00 and Y=0.00
If you can't figure out how to set textures on the panels, check Shifter Gynoid's comment below. He explains nicely what you need to do to display these textures correctly.
5 rings target with a hole
- Rez a ring
- Set Size to: X=0.015, Y=0.700 and Z=0.700
- Set Hollow to: 70.0
- Set Hollow Shape to: Triangle
- Set Hole Size to: X=1.00 and Y=0.50
- Set Profile Cut to: B=0.200 and E=0.800
5 rings target (no hole)
- Rez a torus
- Set Size to: X=0.015, Y=0.700 and Z=0.700
- Set Hollow to: 30.0
- Set Hole Size to: X=0.15 and Y=0.50
- Set Profile Cut to: B=0.125 and E=0.900
4 rings target
- Rez a tube
- Set Size to: X=0.015, Y=0.700 and Z=0.700
- Set Hollow to: 50.0
- Set Hollow Shape to: Triangle
- Set Hole Size to: X=1.00 and Y=0.50
- Set Profile Cut to: B=0.000 and E=0.800
Minggu, 26 Juli 2009
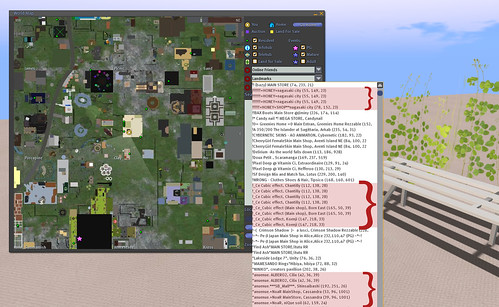
Quick tip: how to easily find repeating landmarks
Recently I decided to sort my landmarks. I never did that ever since I joined SL in 2006, so you can imagine how huge and messy my Landmarks folder was! Now it's all pretty and arranged in folders but still there are landmarks in various clothes or furniture folders, and it's hard to notice the repeating ones. I could have of course checked folder by folder, or have randomly typed names of stores or places, but I wanted something easier and faster. And I found the way! When you open the map, you can use the drop-down Landmarks list to spot groups of similar landmarks. These are all landmarks from your inventory sorted alphabetically, so it's really easy to find the ones you can delete. You still have to go to your inventory to sort them out, but at least you know what you're looking for.
Langganan:
Postingan (Atom)